Showing posts with label side dish. Show all posts

Monday, March 26, 2012

Of Mahindra, Monsters and Miracles


When I saw that Indiblogger was running a Mahindra XUV500 Incredible Stories contest I knew I had to share my own incredible road story about our beloved Mahindra SUV aka 'Monster'.

There is a huge amount of emotion, sentiment and superstition that comes with your first car. Not just the first car your family owned, but the first car that was YOURS. Only and exclusively yours. Bought with your hard-earned money. Or with blood-sucking EMIs as in most cases.

The day the 'Monster' came home...
So our first car was a beautiful, gorgeous black Mahindra Scorpio bought just 6 months after we got married. It was a BIG DEAL. Yup, in capitals! I remember the looooong fights Sid and I had before we actually decided on the Scorpio – coz the EMI of the car was more than the EMI of our 1 bhk home loan and I totally didn’t see the need to buy an SUV at that stage. Our careers were just taking off, we were still doing up our new home slowly and there seemed to be too many expenses and responsibilities. But boys will be boys and Sid’s passion and love for this car left no room for argument. It was a simple case of want over need. And so the Scorpio was welcomed (grudgingly by me) into our lives.

Thursday, May 12, 2011

Quick-fix Paneer Saagwala

Have you ever heard of Red 'Greens'? It exists, I swear! Green leafy vegetable(?) that is actually Red...

I had recently blogged about Chauli Saag or Green Amaranth leaves. Now this is a dish using Red Amaranth leaves or Lal Chauli. It is a very quick and simple recipe that ensures you have your share of nutritious, leafy vegetables without trying to swallow them like medicine.

Paneer Saagwala (Dry)/Cottage Cheese and Greens stir fry

Ingredients:
Red Amaranth leaves - 1 bunch
Paneer/Indian Cottage Cheese - 200gms
Garlic - 4 cloves
Urad Dal/Split Black Gram - 1 tsp
Channa Dal/Split Bengal Gram - 1/2 tsp
Red Chilli Powder - as per taste
Coriander Powder - 1/4 tsp
Cumin Powdered - 1/4 tsp
Salt
Vegetable Oil - 1 tbsp


Thursday, April 7, 2011

Of Sabbaticals and Saag...

I'm quite tired of people asking me - 'So when are you getting back to work?' I know they don't mean to pry (yes, my belief in human kindness is amazing!). It just seems like a polite question you ask someone who has been working since the day she turned 18 and has now suddenly turned into a housewife I guess... But it unsettles me, because I do not have the answer to that question. When am I getting back to work? I don't know. What do I want to do next? I don't know. Will I ever get back to work? I don't know!

People who know me well may say that this is what happens when an innately lazy person like me goes on a break... You get so used to the laziness that you can never quite bring yourself to get back to the grind. Could be true considering how I haven't woken up before 9am on any given day since the day I quit my job. Unless of course we have breakfast plans (which become brunch plans coz I still don't wake up), or a flight to catch, or in-laws are home (in which case it lasts for all of 2 days before in-laws feel sorry for the bleary-eyed, zombie-me and insist I sleep in :)

Tuesday, February 15, 2011

All About Aloo...

There was a time when I had started a blog called AlooWorld. And my profile name was Aloo Girl. Yup, that crazy about potatoes. But that was long ago... no posts saw the light of day and the blog died a silent death.

But my love for potatoes did not die, nuh-huh! In fact, as a kid there was no other vegetable I would deign to eat except potato and the occasional okra/lady's finger. I was the 'annoyingly thin, scrawny kid who is so fussy an eater that the neighbours think her parents starve her'!

So there was this time my mom had had enough of making potatoes every other day for me and my brother. And she came up with a super-evil plan! She decided to cook potatoes for lunch, dinner and every meal in between for an entire week till both me and my brother had aloo coming out of every pore in our bodies (Yeuwwww! Ok that line was soooo not good for active imagination like mine! Now I can visualize mashed potatoes coming out of every orifice, reminiscent of slimy, gross horror movie scenes! Yuck!)

Ok, ok, back to nice, appetizing aloo thoughts.... (frantically waving my hands on top of my head ala Phoebe to clear my head and dispel the disturbing images). So anyway, what eventually happened was that me and R happily wolfed down every aloo meal with no sign of nausea, stomach ache, boredom or any other classic kid bahaana and poor mom had to concede defeat. That's how much I love potatoes!

Thursday, February 3, 2011

Living the 'Filmy' life and Mixed Dal Kasoori Methi

I have been away for so long now that my writing feels rusty! In my defense, it has been a crazy month... those who know me will know that my life has always been filmi. So yes, it has been at it again :P Hmmm... how much can I say without really saying anything?? Yeah yeah, I know sometimes it is better to not say anything at all. But then me being me, I will say this much - in these past couple of weeks, I have talked a lot, screamed a bit, counselled endlessly, cried, hugged, laughed, stayed up all night, lost lotsa money at poker, spent time with my closest friends, fought with another friend, went to a shrink, decided to get a job, then decided to study instead, went for an interview, did not go for another, threw a party, cooked some, broke my bling phone, felt envious, got infuriated, got exasperated, got depressed, got stoned... Weeellll, not necessarily in that order :) So if that isn't the recipe for a masala film, what is??!

For all of you who got stuck on me going to the shrink part, no! It was NOT for me! But still, it was quite a milestone... sitting in a shrink's office.... hehehe!

So anyways, coming back to the blog now seems like some semblance of normalcy has been restored to my life. So I shall hang on to that illusion for a while till the filmi-ness strikes again! :D

Saturday, October 23, 2010

Random 'mutter'ing and Methi Malai Mutter - Fenugreek Leaves and Peas in a Creamy Gravy

I always find it a little strange to write "Mutter" when what I really mean is the more humble Matar (Green Peas). Mutter with its silent 'r' and muted 't' just sounds affected. But I think my grouse is very minor when compared to the writer of the menu below who clearly had his own strong opinions on Indian phonetics and spellings!


The 'Chikan' dishes are certainly not Lucknowi, they are just true to the Marathi pronunciation ;) And as for the 'Panner', 'Shejvan Rice' and 'Mashrom Rice', I dread to think what would have ended up on my plate had I had the courage to order them! But the hands-down winner is the subtly ironic 'Chiken Chilly Liquid'! Yes, look for it wedged between the Chicken Chilly Dry (duh!) and the Hakka 'Nudles'... You can't fault the guy's logic at least!


Monday, October 18, 2010

Rootlessness and Alu-Potola Bhaja

When people ask me where I am originally from, I just don't know what to say. As I hem and haw trying to figure out a suitable uncomplicated answer without getting into my unsavoury family history, I usually mumble a vague reply - "From all over", to which the questioner usually comes up with this gem - "Oh, so your dad was in the army?" More hedging around follows. No such simple way out for me. No army, navy, defence background to explain the anchorless-ness of my life :(

Ok, so to cut short the drama I just launch into the complicated explanation. "See, I'm basically Telugu, but born and brought up in Orissa. But left Orissa for good when I was 16, so since then I studied for 2yrs in Vizag, 3 yrs in Chennai, 1 yr in Mumbai, then worked in Chennai & Hyderabad for a year and now been living in Mumbai for 5-6yrs. Pheww!!"
But if you thought the questioning ends there, you are sorely mistaken. Oh, so where are your parents? Ummm... Mom's a single parent (see that's why we left Bhubaneshwar in the first place) working in Muscat (now in Maldives), Dad-I-haven't-seen-in-10yrs-so-don't-know-and-couldn't-care-less, brother another anchorless soul flitting from this city to that and oh please don't even get me started about my husband who is Punjabi but born and brought up in Hyderabad and is definitely more Telugu than I am. Sigh... so much for trying to hide unflattering family drama!

But look at the bright side I tell myself - aren't we the truly integrated Indian family? D-uh. Yeah, if you think confused roots is a sign of cosmopolitan national integration, why not? A-nyway... the point I'm trying to make, as usual, is actually about food.


There are days when I crave for some childhood comfort food... And a lot of my memories of food are intrinsically linked with Bhubaneshwar, the city that I was born in and grew up in. So comfort food for me is a strange mish-mash of South Indian dishes and simple Oriya recipes. Both my parents were born and brought up in Orissa too, so Oriya food is truly as much a part of our family heritage as the traditional Telugu Brahmin diet.

One of the staple vegetables in Orissa is Potola/Parwal otherwise known as Pointed Gourd. And one of the simplest dishes made in every Oriya home is this Potato and Parwal fry. The picture of the Pointed Gourds below is courtesy Shreya of Mom's Cooking.

Ingredients:

Parwal/Pointed Gourd - 250 gms
Potatoes - 2 large
Panch Phoran - 2 tsp (equal parts jeera/cumin seeds, rai/mustard seeds, onion seeds/kalonji, methi/fenugreek seeds and saunf/fennel seeds)
SaltRed Chilli Powder - 1/2 tsp
Garam Masala - 1/4 tsp
Mustard Oil - 1 tbsp

Wash and peel the potatoes and gourds and cut them into long thin slices. The gourds actually do not need to be peeled, but some people don't like to chew on the slightly tough, crunchy skin. Heat the mustard oil in a wok or kadhai and add the panch phoran. Once the seeds start sputtering, lower the flame and add the sliced potatoes and parwal. Combine well, cover and cook for 7-8min till the potatoes are soft and the parwal is cooked but retains its colour. Now add the salt , chilli powder and garam masala and stir well. Let it cook for another couple of minutes, remove from heat and serve.

The way I like it:

This is a great side dish with rotis and a simple moong ki dal or the tradition Oriya Dalma and rice.


Sunday, October 10, 2010

MasterChef India and Pakistani Radish

I'm watching the very dishy Akshay Kumar on MasterChef saying, "Tasty Dish, warna Game Finish!" as I'm typing this post. MasterChef India premiered last night, and being an obsessive MasterChef Australia and US viewer, I had to catch the first few episodes. I'm still not sure what to think of the show. There is Akshay for eye candy and super-star value of course, and 2 other chefs who seem fairly TV friendly. But I just hope it does not become like the US version where Gordon Ramsay so overpowered the other 2 judges that they just seemed like cardboard cut-outs with little to say or do.

First impressions - the opening lacked the punch. We have seen audition-based opening episodes with queues of people braving rains and heat-strokes many times earlier. The script, I feel, could have been much better. What is it that really sets this show apart from other talent shows? After all, its about cooking and eating - something all Indians love and believe they are experts in - much like Cricket :D But the lines were less than inspiring...
And then there are the contestants - the regular mix of weirdos, sob-stories, talent, people from small towns and villages, cocky youngsters and the kind of contestants we have seen a million times on Indian Idol, Dance India Dance and the like. Now whether they can actually match up to Masterchef cooking standards is yet to be seen. So far, it has been entertaining enough and though Akshay hogs all the limelight, the other 2 judges are not complete wallflowers. So I still have hope!

Now to move on to the Radish which is the other subject of this post... Radish/Mooli/Mulangi is a vegetable that is rarely on people's favorite list. It has a strong, distinctive flavor and as kids we used to hate eating it thanks to the smell which is akin to you-know-what! Raw radish in salads, or sambhar with radish slices is mostly how I have eaten this vegetable.
Then last month there were these amazingly fresh radishes I bought along with the leaves just because they looked so good... And so I trawled the web looking for a good recipe. That's when I came across a recipe for Pakistani Mooli ki Sabzi. Unfortunately, I did not bookmark the page and have been unable to trace it to acknowledge... So if any of you know find the original recipe, do let me know.

Ingredients:
Radish - 1 large (with leaves)
Coriander seeds/Dhania - 1 tsp
Dried Red Chillies - 1
Garlic - 2 cloves
Aamchur/Dried Mango Powder - 1 tsp
Salt - to taste
Vegetable Oil - 1 tbsp
Roasted Peanuts - 8 to 10
Dhania/Coriander leaves - to garnish

Wash and peel the radish and slice it thinly. Chop the radish leaves and garlic finely. Crush the coriander seeds roughly with a rolling pin. In a frying pan, heat the oil and add the garlic, coriander seeds and red chillies. Once they start sputtering and the garlic turns brown, add the chopped radish leaves and slices. Sprinkle the salt and aamchur and cook without covering on a medium to high flame, stirring in between, till the radish slices turn almost crisp. Now add the roasted peanuts and combine well.
The way I like it:
Garnish with some fresh coriander leaves and serve hot with parathas or rotis and dal. Tastes great with rice too.

The flavours in this dish are very simple yet delicious. The aamchur powder lends it a sourness that goes extremely well with the pungent mooli and the only other spices are the coriander seeds and red chillies. Maybe not a dish worthy of MasterChef India (:P) but you will not be disappointed with the crisp radish slices, the crunch of the peanuts and the inherent spice of the radish leaves. I will go out on a limb and say even those of you who hate radish will surely like this dish :)

Wednesday, September 22, 2010

A trio of heat - Red Hot Delights!!


Remember those Red Chillies I blogged about some time ago? Finally, after procrastinating for more than a month, I'm finally posting three hot, hot, hot dishes that the chillies found themselves in...

I have blogged about my favorite food shows on TV earlier and Kylie Kwong being one of them. So the first dish is inspired by her easy Chinese cooking methods and is a Spicy Cottage Cheese & Vegetable Stir Fry.

Ingredients:
Paneer - 250 gms
Spring Onions - 2 to 3
Capsicum - 1 small
Red Chillies - 2
Garlic - 3 cloves
Ginger - 1/2 inch
Peanut Oil - 1 tbsp
Salt
Pepper
Soy Sauce - 1/2 tsp
Balsamic Vinegar - 1/2 tsp
Roasted Peanuts - 5

Julienne the ginger thinly and finely chop the garlic. Heat oil in a wok or kadhai and fry the ginger and garlic. Now add cubes of the paneer/cottage cheese, 2 spring onions, sliced capsicum and 1 red chilli sliced diagonally into small pieces. Reserve one spring onion and one chilli for garnishing.

Add the salt, pepper, vinegar and soy sauce and toss the vegetables. Add the roasted peanuts right at the end and give it a stir.

Cottage Cheese & Vegetable stir fry
Cut one spring onion lengthwise and finely slice it into strips, chop a red chilli into thin pieces an garnish the stir fry with these. Serve hot with rice or noodles.

Paneer on FoodistaPaneer


Chinese Pickled Red Chillies

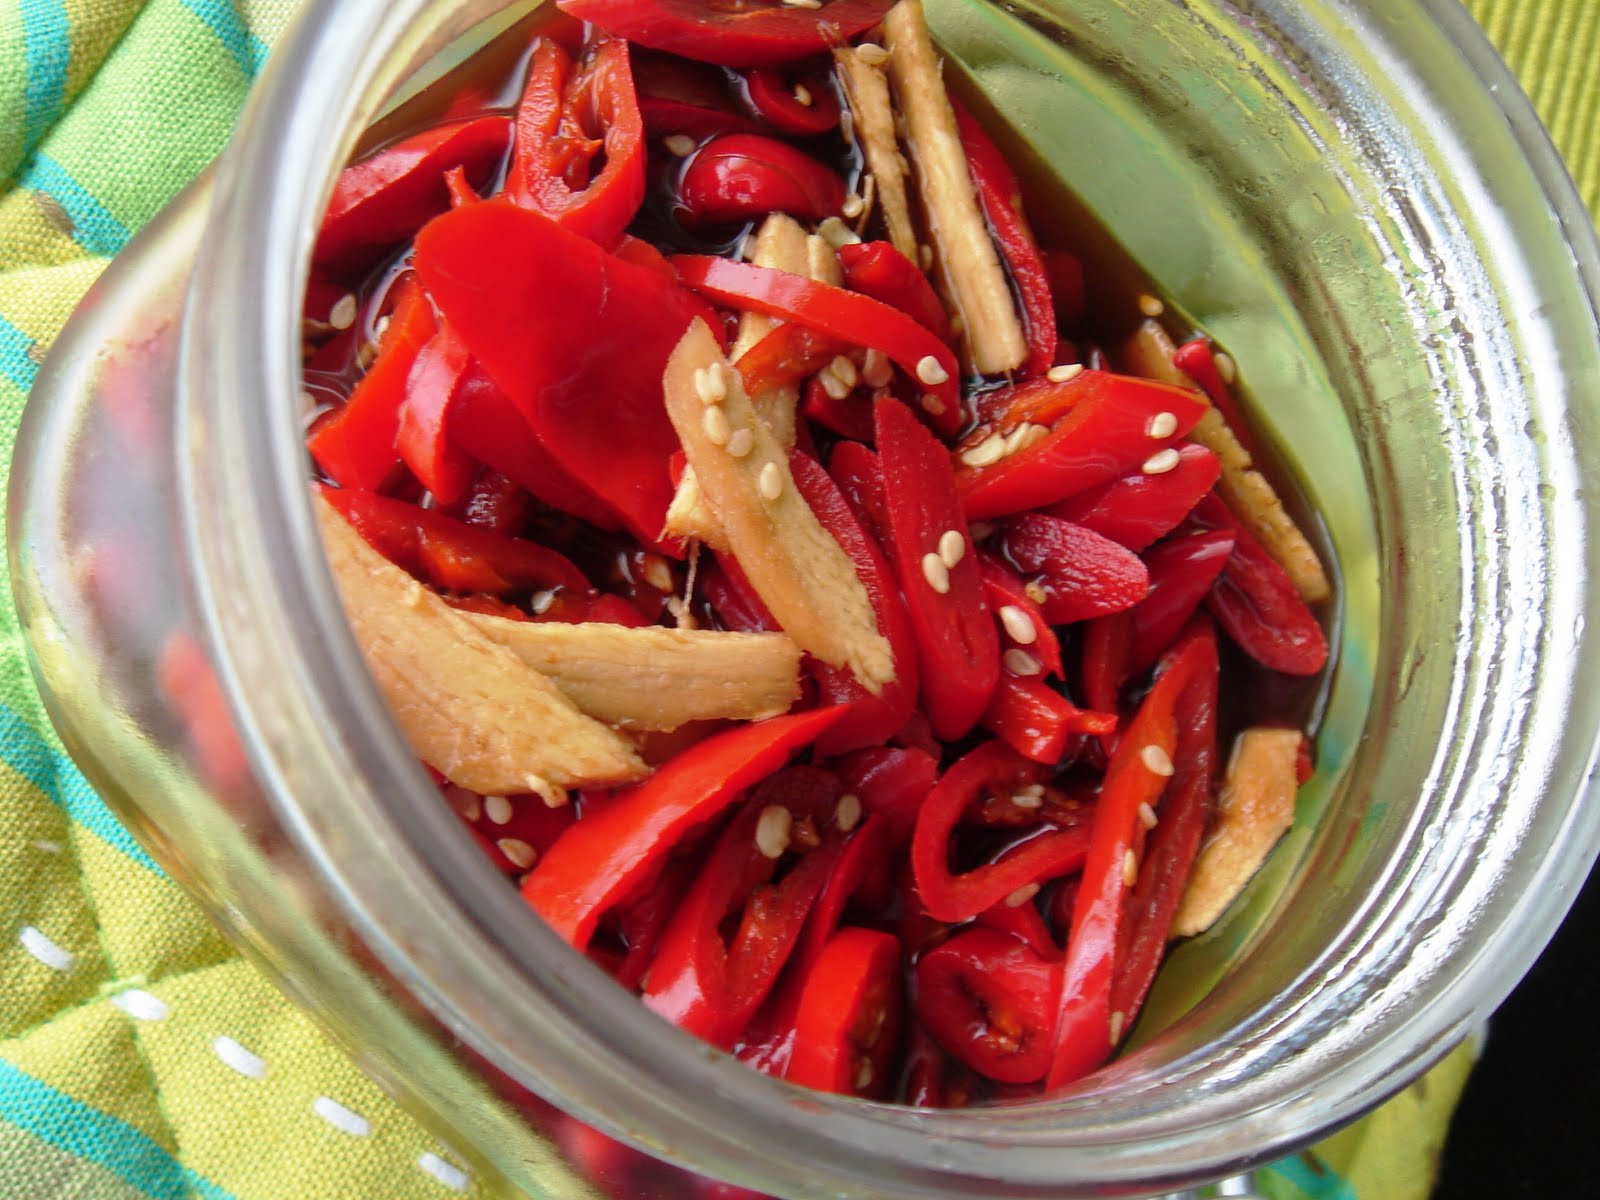
I absolutely love Chinese pickles. I have often pickled carrots, onions and cucumbers and stored them in glass jars in the refrigerator. And these chillies seemed just right for dunking into some Chinese sauces and spices and preserved for everyday use. It is a very simple recipe and the chillies are still going strong :) which means they will keep for about a month in the fridge.

Ingredients:

Fresh Red Chillies - 7 to 8 chopped diagonally into thin 1 inch pieces
Ginger - 2 inch piece - sliced into small thin pieces
Light Soy - 10 tbsp
Dark Soy - 5 tbsp
Vinegar - 12 tbsp
Sugar - 1 tbsp
Salt - 1 tsp
Schezwan peppercorns - 1/2 tsp - roasted and ground
Sesame seeds - 1 tsp
Spicy Red Chilli Pickle

Mix all the ingredients together in an air-tight glass jar. Close the lid, give it a good shake and refrigerate for 2-3 days before using.

You can adjust the quantities of the sauces as per your taste. The sweet, sour and spicy pickled chillies go amazingly well with sandwiches, rotis, rice, rolls, and just about anything!


Chilli-Garlic Rub

The third recipe I concocted with the red chillies is a very versatile rub that can be used in a variety of dishes as a sauce, curry paste or just a marinade. I used it as a rub to grill some chicken pieces and it added a lovely, unique kick to them.
Chilli Garlic Rub
Ingredients:

Fresh Red Chillies - 8
Garlic cloves - 10
Olive oil - 1 tbsp
Salt - 1/2 tsp
Cloves - 2
Cinnamon - 1/2 inch stick
Peppercorns - 4
Star anise - 1
A dash of red rum

Grind all the above ingredients together to make a paste and use as desired. The rum adds a sweet note and if you are using the rub to roast or grill some chicken, it will give a nice glaze to the dish.

Whew! So that's how spicy my last month was! :) I also got some lovely suggestions from friends. So here are some more recipe ideas:

Ritu - Red chilli, tomato and honey paste to grill fish/chicken
Thara - 125 gms red chillies, 20 garlic cloves, 1tbsp cumin seed, (olive) oil 3 tbsp, salt to taste.
Grind all but oil with little water to fine paste. Heat oil, on medium heat, saute chutney gently for 5-7 mins. Remove from heat, cool, store. Lasts several days
Arundati - Really Hot Red Chilli Pickle

Thursday, September 9, 2010

Karele ke Pakode - a Mom-in-law special!

The moment you say karela (bitter gourd) half the people I know cringe. It is a much-maligned vegetable and very few people can really handle the bitterness of karela, me included! And so the bitter gourd almost never found a place in my shopping basket or refrigerator. That is, until my mom-in-law arrived...

Mom makes some really amazing bitter gourd fry that I have tasted earlier... it's really simple. Grate away the skin, slit the gourds in the middle and de-seed if you like, cut each bitter gourd into 2-inch pieces, and stuff with dry masala (salt, coriander powder, cumin powder, aamchur, pepper). Then tie up the pieces with some string so that the masala doesn't fall out of the slits, and shallow fry in about 4-5tbsp of oil. Voila! You have this amazing side dish of spicy fried bitter gourd!

But I'm sure every household has some version of this. However, this post is not about the Karela fry. Now I have you confused, don't I? Ok, it is about the skin of the bitter gourd. Yes, go back and read the first line... that dark green ridged skin that we grate away? Now just save that for my mom-in-law's mind-blowing bitter-gourd skin fritters. Yes, you heard me right! Tikkis or pakoras made with karele ka chilka :)

Fritters made with the skin of Bitter Gourds

Ingredients:


Bitter gourd skin - grated - 1/2 cup
Besan (Gram flour) - 1 cup
Cooking soda (Meetha soda) - 1/2 tsp
Ajwain - 1 tsp
Coriander seeds - 1 tsp
Finely sliced onions (optional) - 1 small
Green chillies - 2
Salt
Pepper
Coriander leaves
Oil - 1/2 cup


Squeeze out the water from the grated bitter gourd skin. Make sure you dont grate the skin too finely otherwise it will just be a mush. Add the besan, salt, pepper, ajwain and soda and mix well. Lightly crush the coriander seeds and sprinkle. Slice the green chillies into small pieces and add along with the pepper. You can also add some finely sliced onions and fresh coriander leaves. Splash a little water and mix all these ingredients together to form a light dough. Take small amounts of this mixture and pat into flat round shapes.

Now take these tikkis/pakoras and shallow fry them in a frying pan with 1/2 cup of vegetable oil.


The way I like it:

Garnish with fried onions or fresh coriander leaves and serve hot and crispy with some sweet chilli sauce or tomato sauce. Great as a tea time snack or as an accompaniment with rice and rotis.

I totally lost count of how many I devoured!! And yes, it took a lot of self control to not gobble them up immediately and click these pictures instead, much to my mom-in-law's amusement!

Wednesday, July 28, 2010

Birthday Blues and Corn Curry

Yup, last week I entered the 3rd decade of my life... I was down and out for quite a while and the run-up to my 30th was anything but fun :( I was experiencing the blues in a bad way and just knew the birthday would be as anti-climactic as ever.

My birthdays since childhood have never really stood out as days to be remembered. I just have memories of snatches of conversations, or fun moments; but nothing that's a memory to cherish forever. I think it all started with my very 1st birthday which, I believe, was a very big deal with "foreign" clothes and toys, a humpty-dumpty confetti bag that showered chocolates, and a really big cake. And what do I have to show for it? Nothing! Yup, nothing. Coz my dad forgot to load the camera with film reel and just kept clicking away into nothingness! So now you know anti-climactic.

In school, there was the tiny excitement of wearing new clothes, the anticipation of gifts and the hope of getting noticed by the boys; but it never really culminated into any birthday worth remembering... (unless you count the one where we were playing dark-rooms hide-n-seek and I spilt an entire bottle of ink on all my books and my new pink jeans... or the one where I got pinched by my mom in the middle of the party for asking everyone how much my gifts cost. yeah, I was right. they don't count.)

I think the best birthdays I actually had were during the 2 years spent in this godforsaken women's hostel ironically called 'Stree Seva Mandir' during my undergrad. I had an amazingly cool and diverse set of friends in Shy, Hemu, Paro and Appu who remain friends for life... All our birthdays here were replete with Enid Blyton style secret midnight parties, birthday bumps, cake-smearing, cheap but thoughtful gift-giving, and crazy dancing!

You can't blame me now if all my birthday celebrations post that seem staid and boring. What's to compare with a bunch of young girls flailing their arms to muffled Bollywood music in a sweaty, cramped, dimly lit 10x10 room and trying to keep it a secret from the cranky old warden??! The fear of getting caught always does add to the adrenaline rush, don't you think? :)

So anyhoo... birthdays are just birthdays and I didn't want this year to be just another one of those. And it wasn't... To break the suspense to you all who are patiently reading through my rant, I got the best gifts ever this year with Sid flying down a human parcel of my best friend from B'lore to Mumbai being the best one of the lot! :) Yes, as my beloved cousin and soul-sister U keeps reminding me, I AM a very lucky girl.... As gifts go, I couldn't be more satiated, happy, overwhelmed... But is it really horrible to say that I still feel a sense of anti-climax? Maybe there is no getting away from it. Or maybe, that's just how a birthday feels, you know. It could be just me who thinks this feeling is that of an anti-climax. Maybe its just the "birthday feeling"....

So D-day was spent catching up with my best friend, loitering at home while being given gifts by the hour by Sid, and me making a light and drool-worthy Corn Curry and slicing the top of my finger off in the process. Yeah, don't ask. But if you must, it was a huge, cool Chefline cheffy knife. Gaah! But the Birthday Corn Curry did turn out well in spite of everything.

Ingredients:

Corn on the cob - 2
Onion - 1 large (chopped)
Green chillies - 4 (sliced)
Grated coconut - 3 tsp OR Coconut milk - 1/4 cup
Milk - 1/4 cup
Salt
Cumin/Jeera - 1 tsp
Jeera powder - 1/2 tsp
Curry leaves
Vegetable Oil - 1 tbsp

Boil or pressure cook 2 whole ears of corn in water with a teaspoon of salt. Cool and slice each corn cob latitudinally into 3-4 pieces. In a kadhai or a non stick vessel, heat 1 tbsp of oil and splutter the cumin seeds and curry leaves. Add the chopped onions and sliced green chillies. Once the onions turn golden brown, add a pinch of salt and the jeera powder and mix well. Now add the sliced corn cob pieces, the freshly grated coconut, and the milk.

Pour in some water if necessary. Cover and cook on a low flame for 6-8min till the corn absorbs the flavour of the spices, and its done!

The way I like it:
Serve hot with plain rice. It can be a little difficult to wield the chunky pieces of corn, so the best way is to use your hands :) Or just use a fork to spear it and make a mini meal of the dish by itself. It is a very light and flavorful dish and the coconut is not at all over-powering. Sid hates coconut in food and he slurped up the sauce willingly, so I think that's a good sign !

This Coconut Corn Curry is my entry for Priya's Veggie/Fruit a Month Event: Corn being hosted by Torview Toronto.

Oh, you thought that was the end of the post?! My handful of faithful readers, I'm in a positively rambling mode. So now is the time for you to navigate away from the page!
.........
.........
.........
Ok, I did issue fair warning. So to continue with my down-in-the-dumps story to those of you still around, after the top of my finger was sliced off, things seemed to improve. (Strange are the ways of birthdays!) So I dressed up and cheered up - almost always interlinked, these two emotions - and off we went for a lovely dinner with our closest friends to a restaurant in Malad called 'The Laughing Cavalier'. Funny name, no?

After some so-good-its-not-funny wood-fired pizza, lasagna, fusion chicken kababs and fettuccine, it was time to blow out the birthday and bring in my 3rd wedding anniversary :) (Yup, I'm one of those freaks who got married the day right after her birthday).
More wonderful gifts ensued :) :) A long night of poetry and poker followed. And that was the climax of the birthday and of this post.

Cheers (*clinks glass*) to turning 30. All of you out there who get despondent on your birthdays, all I can say is - you have company. Lots of it. And as long as you have a loved one trying to make it special, that's all that matters... isn't it?

Though secretly? I was hoping for a surprise party with lots of mad dancing! Hmm... but well, I'm sure to get depressed next year around the same time again ;)

Monday, July 26, 2010

Lemon-Pepper Baby Potatoes

I am an out and out potato girl. I know it sounds boring and staid, but really, I can eat potatoes 3 times a day, 7 days a week, 365 days a year! Give me potatoes in any form and I'll be happy and contented :)

So these baby potatoes here are my all-time favorite and typical comfort food for me. They can be cooked up in a jiffy and taste mind-blowingly hot and delicious. I made these in the microwave, but they are equally easy to make on a stove-top too.

Ingredients:

Baby potatoes - 250 gms
Garlic cloves - 4
Vegetable Oil - 2 tbsp
Lemon pepper - 1 tsp
Chilli flakes
Salt

Wash the potatoes well and place them in a microwave-safe bowl filled with water that's a couple of inches above the potatoes. Sprinkle some salt and add a little oil. If your microwave has the express cooking option of boiling potatoes, then set the weight and choose that option. If not, just cook them in the microwave on medium high (Power 2) for about 15-20min. Keep checking if done at regular intervals by piercing the potatoes with a fork, as the time may differ depending on the kind of microwave you have and the variety of the potatoes.

Once the potatoes are boiled, cool and peel them. In another micro safe bowl, pour in 2 tbsp of vegetable oil, add the chopped garlic cloves and heat it for 30sec. Once the garlic starts to brown, add the potatoes, toss well and nuke it again for 4min. Keep tossing at intervals and nuking it till the potatoes start turning a golden brown. Now add the lemon pepper and chilli flakes. Sprinkle some more salt if needed.

If you dont have lemon pepper, then sprinkle a generous amount of freshly ground black pepper, grate the zest of half a lemon, and squeeze in about 1tsp of lemon juice.

Toss well, cook for another 2-3min till the potatoes look nicely fried. Garnish with some coriander leaves.
The way I like it:

Serve hot with rice or rotis. Or just transfer them into a bowl, put in some toothpicks or forks, and serve as a starter.

Am sending this off to Srivalli's 365 days of Microwave Cooking and her MEC event on "Favorites" being hosted by Seduce your taste buds.


Monday, May 3, 2010

Mango Dal with Sauteed French Beans


Mango Dal (Mamidikaya Pappu) is an integral part of all South-Indian cooking in the summers. And with he abundance of raw mangoes available now, I decided to try my hand at this childhood favorite.

Ingredients:

Raw Mango - peeled and chopped into large pieces - 1
Toor Dal - 1 cup
Turmeric - 1 pinch
Salt - To taste
Mustard seeds - 1 tsp
Asafoetida/Hing - 1 pinch
Red Chillies - 2
Oil - 1 tsp

Pressure cook the Toor dal and the mango pieces in 2 cups water with a pinch of turmeric and some salt. The dal and the mango pieces should be soft and cooked, but not mushy. In a heavy bottom pan, splutter the mustard seeds, red chillies and hing in some oil. When they start crackling, add the cooked dal and mangoes and stir well. Garnish with some grated raw mango and coriander leaves.


Sauteed French Beans

Along with the Mango Dal, I made some simple Sauteed French Beans that tasted great with rice. It took me just 10min to cook this and I really liked the light flavours...though Sid with his thoroughly Indian palate thought he could do with more masalas!


Ingredients:

French Beans - 250 gms
Oil for tempering
Mustard seeds
Asafoetida/Hing - 1 pinch
Salt
Black Peppercorns
Lemon juice

Wash the french beans and slice them into 2 long pieces each. In a wide frying pan or wok, crackle the mustard seeds and asafoetida in 1 tbsp of oil. Add the beans and sautee for about 5min till they are cooked but retain their crunch. Turn off the gas and sprinkle some salt and freshly ground black pepper. Add a dash of lemon juice, stir well and serve hot with some rice and dal.

Monday, April 26, 2010

Mixed vegetables and bacon stir fry

I love looking at the meat and sea food section at HyperCity... and this in spite of the fact that I really do not eat red meat. But just looking at all the different selections of frozen and fresh meats, cuts, marinades, etc makes me want to experiment! So the last time I was there, I couldn't resist picking up a packet of frozen Streaky Bacon.

I'm usually really hesitant to try out any form of red meat. So the simplest form of eating the bacon without getting assaulted by the smell of red meat, was frying the bacon strips to go with an egg-and-toast breakfast. The crispy bacon tasted yummy as a breakfast accompaniment! All you have to do is just fry the strips in their own fat till they start sizzling. Turn them over and fry both the sides till done. I personally like my bacon to be well-done and crunchy, but you could just keep them pink and chewy too.

The crunchy bacon also found its way into this simple stir fry that i made with mushrooms, baby corn and assorted vegetables.

Ingredients:

Button mushrooms - 1/2 cup - sliced
Baby Corn - cut diagonally into 1 inch pieces - 1/2 cup
Red and Yellow Peppers - Sliced into thin strips - 1/2 cup
Streaky bacon - 2 strips
Garlic - 3-4 cloves
Green chillies - 4
Soy sauce - 1 tsp
Green Chilli Sauce - 1 tsp
Balsamic Vinegar - 1/2 tsp
Blue cheese - 1/2 tsp
Salt
Pepper


In 1 tbsp cooking oil, saute the sliced garlic cloves till brown. Add the green chillies, mushrooms, baby corn and peppers. Sprinkle in some salt and pepper, cover and let cook for 2 min.

In a frying pan, place the strips of streaky bacon and fry until crispy. You don't need to add any oil as the bacon will release its own fat.

Break the fried bacon strips into pieces and add it to he vegetables. Pour in the soy sauce, chilli sauce and balsamic vinegar and stir in the blue cheese. Adjust seasoning and serve hot with some noodles or fried rice.

The picture is really bad as it was clicked on my much-abused mobile phone, but it definitely tasted better than it looks! :D

Saturday, April 3, 2010

Fried Cabbage with Peanuts


Cabbage is one of those vegetables that i really don't think much of. I have always felt that it has no distinctive taste and its smell is nothing less than revolting. But there are times when I jus pick up a head of cabbage for lack of anything else to choose from.

And it has always ended up in the same unexciting cabbage fry. The only change is when I go home and my mom adds a little coconut to the cabbage to give it some character.

So this week, when my cook asked me if she should fry the cabbage as usual, i just asked her to shred it into little pieces and keep it in the fridge. I was completely out of ideas. Salad? But that wouldn't be a filling meal by itself. Koftas? Too much effort on a working day. As i poked around in the fridge looking for some inspiration, I saw a small container in which I had stored some ground, roasted peanuts. And voila! This is the dish I came up with - really simple and easy, and takes just about 10min to cook. And the end result was mouth-watering.

Ingredients:

Cabbage - 1 small, shredded
Peanuts/groundnuts - 1/2 cup,roasted and coarsely ground
Oil - 1 tbsp
Dried Red Chillies - 2
Asafoetida (Hing) - 1 pinch
Mustard seeds - 1 tsp
Salt

Heat the oil in a heavy-bottomed pan and splutter the mustard seeds, red chillies and asafoetida. To this tadka add the roasted, ground peanuts and the shredded cabbage. Cover and cook for 5min. Add the salt and stir well. Take off the flame when the cabbage is a little soft, yet retains its colour and crunch. Don't let it get too soft or mushy.

Serve hot with rotis and pickle/chutney.

Friday, March 26, 2010

The all-time favourite RAJMA


There is rajma, and then there is rajma. I mean its ubiquitous, yet like Kaali Dal, it’s rare to find the perfect rajma. Frankly, I never could understand the draw of “rajma-chawal” till I had some authentic rajma made by my mom-in-law.

Ok, I know there isn't any rocket science to making Rajma. But believe me, when it’s your mom-in-law who is going to judge it with her true-blue Punjabi cooking standards, then it is indeed daunting! And to top it all, it was my very first attempt at cooking this dish. So when i decided to make this last month for Sid's parents, I was a little unsure how it would turn out. But I was really pleased with the results and my in-laws and Sid loyally claimed it was as good as it could get!


First of all, it’s the kind of rajma (red kidney beans) you choose. Go for the small Kashmiri variety. It cooks faster and turns soft easily. The bigger variety remains hard no matter how long you cook it for. Secondly, go for whole roasted spices and chopped masala instead of mixer-ground one. I think that does the trick.

Ingredients:

Red beans/ Kidney Beans/ Rajma – 1 cup soaked overnight
Tomatoes – 3 large chopped or Tomato puree – 1 cup
Onions – 2 medium sized, chopped
Ginger Garlic paste – ½ tsp
Green chillies – 2, chopped into pieces
Black pepper powder – ¼ tsp
Red chilli powder – ½ tsp
Garam Masala – ½ tsp
Salt to taste
Milk – ¼ cup
Coriander - for garnishing

Whole Spices:
Cinnamon – ½ inch piece
Cloves – 2-3
Whole coriander seeds – 1 tsp
Whole jeera/cumin – 1 tsp
Cardamom – 2 pods

Pressure cook the soaked kidney beans with water and salt for 15 min (I let it cook for 4 whistles on high and 2 on low flame). Dry roast all the whole spices for a minute on high flame. Stop when they start smoking a bit and the smell permeates your whole kitchen! Remove from flame, cool and then grind them into a fine powder. In a deep bottomed pan or kadhai, fry the chopped onions in a little oil. When it turns translucent, add the chopped tomatoes, green chillies and ginger garlic paste and cook well for a few minutes. Add a little water if needed. When the onion and tomatoes reach a paste like consistency, add the ground whole spices and all the remaining spices. Mix well. To this, add the cooked kidney beans along with the water. Mix well , cover the kadhai and let it cook for 10-15min. Keep stirring in between. The curry should now be thick, red and bubbling. Add a little milk, adjust seasoning, mix well and garnish with coriander leaves.

Take off the flame and serve with rice or rotis. The rajma should be soft and melt-in-the mouth.

Tuesday, March 2, 2010

French Beans – Oriental style


Having a cook in Mumbai is a boon and a bane. Throughout the week I don’t have time to even enter the kitchen, so to have freshly made food ready when I reach home for dinner is really a blessing. But the problem is that everything begins to taste the same after a point. Especially vegetables like beans, bhindi and even the ever-adaptable potato. In fact I dread buying beans now coz I can predict exactly what the dish my cook makes will taste like. But at this rate, we will soon run out of vegetables to eat... like cabbage – which has already gone off our shopping list. So in an effort to salvage beans, I decided to try out this Oriental style stir fried beans by just putting in whatever I liked. And I must say, the result was not bad at all!

Ingredients:
French beans - 250gms
Garlic chopped – 4 to 5 cloves
Ginger garlic paste – 2 tbsp
Soy Sauce – 1 tsp
Chilli Sauce – 1 tsp
Vinegar – ½ tsp
Thai Sweet Chilli Sauce - Optional
Salt
Roasted Peanuts – a handful
Toasted sesame seeds – to garnish

Wash and dry the beans. Trim the ends and cut them into halves. In a large non-stick frying pan, put 2tbsp of oil and fry the chopped garlic till it starts to brown. Then put in the ginger garlic paste and fry until golden brown. Put in the beans and mix well. Cover the pan and let the beans cook for about 3-4min. Remove the lid, put in the soy sauce, chilli sauce, vinegar, salt and roasted peanuts. For those who like it a bit sweet and spicy, you can add a spoon of Thai sweet chilli sauce for that additional tang. Stir for 2-3min. Take it out into a bowl and garnish with toasted sesame seeds. Serve hot with rice or rotis.

Tuesday, February 23, 2010

Spicy Brinjal Roundels

I never would have thought that I would start my first Food Blog with a vegetable I used to hate as a kid. My mom's oft-repeated line - Wait till you grow up and get married, then you will start liking everything - used to pretty much fall on deaf ears. But now I have to agree - mothers always know!

Honestly, I'm still not a huge fan of Brinjal or Eggplant in any form. But dont mind the occasional Bharta. Especially this amazingly yummy version with milk and cream that a friend's husband once made! But that's for another day.

These Spicy Brinjal Roundels are my version of the Oriya "Baigan Bhaja" my mom used to make during our growing up years in Bhubaneshwar. Its really easy to make and my husband loves them :)

Ingredients:

1 large Brinjal (Bharta variety)
Turmeric - 1 tsp
Salt - 1 tsp
Chilli Powder - 1/2 tsp
Chat masala or garam masala - 1/2 tsp
Mustard oil - 1 tsp
Sunflower/vegetable oil - to shallow fry

Wash and cut the brinjal into thin roundels. Put all the pieces into a vessel alongwith the turmeric, salt, chilli powder, garam masala and mustard oil and mix well. Each roundel should be evenly coated with the mixture.

Take a non-stick frying pan and pour in about a tablespoon of vegetable oil. When the oil is hot enough, put in 5-6 of the roundels and make sure they are evenly spread out. Fry them for about 2 min and turn them over on the other side for another 2-3 min.

If your slices are slighly thicker, you might need to cover the pan for a little while. Fry all the roundels in batches and you have crispy, spicy brinjal fry ready in munutes.
PS - Apologies for the bad pictures taken on my phone. Promise to take better ones with a proper digicam from next time.